
自研Saas系统之路(二)基础环境搭建GitLab WebHook
在自己研究一套Saas系统的时候,想做到集群部署,考虑到协同开发自己搭建代码托管服务器,使用GitLab搭建。
关于如何在自己的服务器上面搭建GitLab这个后续会补充。本次先暂时讲解下Webhook
因为考虑到要做到集群部署的话,这样就需要每次更新代码都需要到每台服务器上面去进行更新,后面考虑到使用git 的 webhook这个功能,在每次提交代码的时候,请求服务器,自动git pull代码,这样就节省了很多的工作量。
1、首先在码云或者GitHub中自己创建好一个仓库,在仓库设置中点击WebHook。
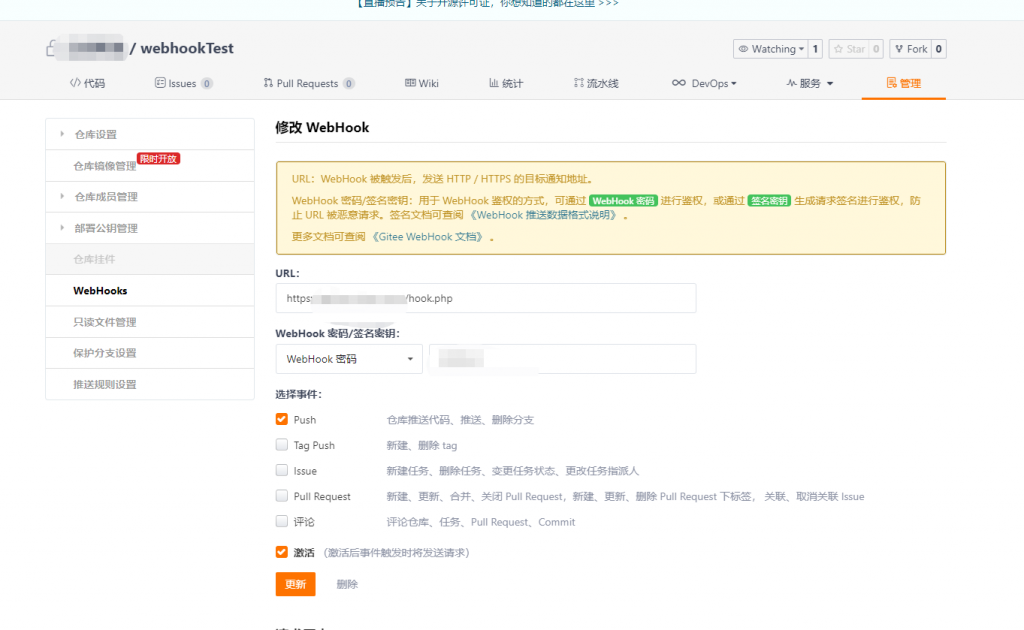
注意:URL为:自己的域名+自动执行git pull的代码,在这我是使用PHP代码进行测试的。我这贴出hook.php 代码。
<?php
##要打开shell_exec函数,默认为禁用
$json = file_get_contents("php://input");
$data = json_decode($json, true);
##加一些验证,不要裸奔
##我这里就是弄了密码,webhook弄了个密码
echo "开始";
var_dump($data);
if ($data['password'] == "你的密码") {
    if (isset($data['ref']) && $data['total_commits_count'] > 0) {
        $res = PHP_EOL . "pull start ---------------------------------------------" . PHP_EOL;
        $res .= shell_exec("cd /www/wwwroot/webhooktest/webhook-test/ && git pull 2<&1");

##注释的地方我做的一些分支判断更新,根据自己的需求来,基本第一个就可以满足了。
        if (strpos($data['ref'], 'dev1') > 0) {
            $res .= shell_exec("cd /www/wwwroot/webhooktest/webhook-test/ &&  git stash && git pull origin dev1 && cd .git && chown -R www:www objects 2<&1");

        }
        // elseif (strpos($data['ref'],'master')>0) {
        //      $res .= shell_exec("cd 项目所在目录 &&  git pull origin master && cd .git && chown -R www:www objects 2<&1 ");
        // }else{

        // }

        $res_log = '------------------------------------------------------------' . PHP_EOL;
        $res_log .= $data['user_name'] . ' 在' . date('Y-m-d H:i:s') . '向' . $data['repository']['name'] . '项目的' . $data['ref'] . '分支push了' . $data['total_commits_count'] . '个commit:' . $data['commits']['message'];
        $res_log .= $res . PHP_EOL;
        $res_log .= "pull end -----------------------------------------------------" . PHP_EOL;
        file_put_contents("/www/wwwroot/webhooktest/webhook-test/".date('Y-m-d', time()).".txt", $res_log, FILE_APPEND);
    }
}
echo "结束";

//git webhook 自动部署脚本
//项目存放物理路径,第一次clone时,必须保证该目录为空
$savePath = "/www/wwwroot/webhooktest/webhook-test/";
$gitPath  = "自己的代码仓库";//代码仓库
$email = "仓库邮箱";//用户仓库邮箱
$name  = "仓库用户名";//仓库用户名,一般和邮箱一致即可

$isClone = true;//设置是否已经Clone到本地,true:已经clone,直接pull,false:先clone.

//如果已经clone过,则直接拉去代码
if ($isClone) {
    $requestBody = file_get_contents("php://input");
    if (empty($requestBody)) {
        die('send fail');
    }

    //解析Git服务器通知过来的JSON信息
    $content = json_decode($requestBody, true);
    //若是主分支且提交数大于0
    if ($content['ref']=='refs/heads/master' && $content['total_commits_count']>0) {

        $res = PHP_EOL."pull start --------".PHP_EOL;
        $res .= shell_exec("cd {$savePath} && git pull {$gitPath}");//拉去代码

        $res_log = '-------------------------'.PHP_EOL;
        $res_log .= $content['user_name'] . ' 在' . date('Y-m-d H:i:s') . '向' . $content['repository']['name'] . '项目的' . $content['ref'] . '分支push了' . $content['total_commits_count'] . '个commit:';
        $res_log .= $res.PHP_EOL;
        $res_log .= "pull end --------".PHP_EOL;
        file_put_contents("/www/wwwroot/webhooktest/webhook-test/git-webhook_log.txt", $res_log, FILE_APPEND);//写入日志到log文件中
    }
}else {
    $res = "clone start --------".PHP_EOL;
    //注:在这里需要设置用户邮箱和用户名,不然后面无法拉去代码
    $res .= shell_exec("git config --global user.email {$email}}").PHP_EOL;
    $res .= shell_exec("git config --global user.name {$name}}").PHP_EOL;
    $res .= shell_exec("git clone {$gitPath} {$savePath}").PHP_EOL;
    $res .= "clone end --------".PHP_EOL;
    file_put_contents("/www/wwwroot/webhooktest/webhook-test/git-webhook_log1.txt", $res, FILE_APPEND);//写入日志到log文件中
}
需要将hook.php文件的权限提至 777。
于此同时需要将php的shell_exec开启,否则你将会看到如下报错信息。
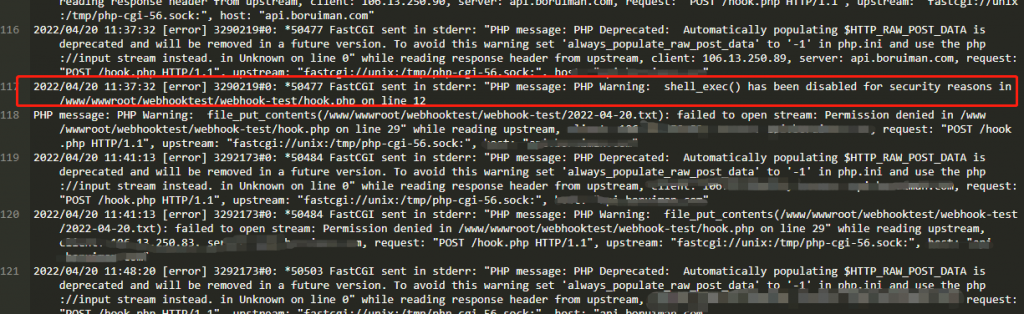
如果出现无日志文件输出的话,检查是否权限开启。
尝试提交一次代码,触发钩子。出现问题(fatal: could not read Username for ‘https://gitee.com’: No such device or address),是因为没设置密码
进入自己的项目
cd .git && vi config[core]
repositoryformatversion = 0
filemode = false
bare = false
logallrefupdates = true
[remote "origin"]
url = https://username:passwd@gitee.com/channel_haixia/channel_dist.git
fetch = +refs/heads/:refs/remotes/origin/
[branch "dev1"]
remote = origin
merge = refs/heads/dev1将url设置一下自己的账号密码。
设置免密
git config --global credential.helper store因为你的账号密码中有特殊字符,Linux特殊字符需要用urlencode转义。比如的就是邮箱 123456789@kent.work 这里的@要进行转义

所以我的账号要改成 123456789%40kent.work 这样就可以了。